• Home
  • liveCricket
  • About
  • support
  • Read Malayalam Font
  • Powered by Blogger.

tech79

  • Home
  • World
  • US
  • Business
    • Category
      • Category
      • Category
      • Category
      • Category
    • Category
    • Category
    • Category
  • Entertainment
  • Sports
  • Technology
  • Editor's picks
  • Top Stories
    • Category
    • Category
    • Category
    • Category
You are here : Home »


 Press and hold left Alt key on your keyboard.

• While holding Alt key enter one of the codes below to get the corresponding facebook symbol.

• Important note: You need to use numbers on the right side of the keyboard for entering code, not the numbers on top, otherwise they won’t work.

Laptop instructions for ALT facebook symbols:
• Press and hold left Alt key on your keyboard.

• While holding Alt key also press and hold Fn key.
• While holding Alt and Fn key enter one of the codes below to get corresponding facebook symbol.

• Important note: You need to use numbers that are usually written next to letters U, I, O… and in different color, not the numbers on top, otherwise they won’t work.

Alt + 1 ☺
Alt + 2 ☻
Alt + 3 ♥
Alt + 4 ♦
Alt + 5 ♣
Alt + 6 ♠
Alt + 7 •
Alt + 8 ◘
Alt + 9 ○
Alt + 10 ◙
Alt + 11 ♂
Alt + 12 ♀
Alt + 13 ♪
Alt + 14 ♫
Alt + 15 ☼
Alt + 16 ►
Alt + 17 ◄
Alt + 18 ↕
Alt + 19 ‼
Alt + 20 ¶
Alt + 21 §
Alt + 22 ▬
Alt + 23 ↨
Alt + 24 ↑
Alt + 25 ↓
Alt + 26 →
Alt + 27 ←
Alt + 28 ∟
Alt + 29 ↔
Alt + 30 ▲
Alt + 31 ▼

A - Z ,alt +( 65 to 90)
a - z , alt+(97 to 122)

eg:
       alt+65 A
       alt+66 B
       alt+97 a
       alt+98 b          etc.,

----------
The Autorun for USB Devices can certainly help you a lot in accessing the content of the device faster and easier. But for most of the people, this feature is useless and can become annoying at times. Windows doesnt provide a direct option to disable this feature but we can do it with a simple hack. 


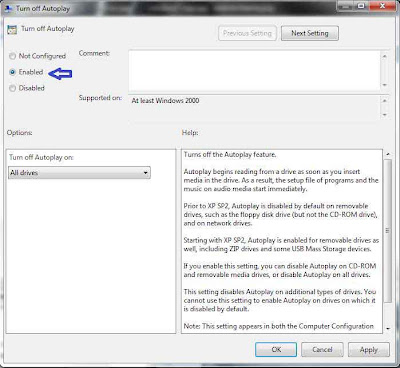
  • Go to Run and type "gpedit.msc". This will open the Group Policy Editor.
  • From there,go to Computer Configuration-> Administrative Templates->Windows Components ->AutoPlay Policies and double click on "Turn Off Autoplay".


Disable Autorun for Pendrives and USB Devices in Windows 7


  • This brings up a new dialog box like the one shown above. Mark the "Enabled" radio button and click on apply.
Plug in a USB device to see the hack in action! 


Windows7
The Windows 7 Disk Management tool provides a simple interface for managing partitions and volumes.
Here’s an easy way to create a new partition on your disk. 

  1. Open the Disk Management console by typing diskmgmt.msc at an elevated command prompt.
    Disk Management Windows 7

  2. In Disk Management’s Graphical view, right-click an unallocated or free area, and then click 
    New Simple Volume. This starts the New Simple Volume Wizard. (Note: If you need to create 
    unallocated space, 

    Read the Welcome page and then click Next.

  3. The Specify Volume Size page specifies the minimum and maximum size for the volume in
     megabytes and lets you size the volume within these limits. Size the partition in megabytes
     using the Simple Volume Size field and then click Next. 
    On the Assign Drive Letter Or Path page, specify whether you want to assign a drive letter
     or path and then click Next. The available options are as follows: 


  4. Assign The Following Drive Letter Select an available drive letter in the selection list 
    provided. By default, Windows 7 selects the lowest available drive letter and excludes
     reserved drive letters as well as those assigned to local disks or network drives.
    Mount In The Following Empty NTFS Folder Choose this option to mount the partition
     in an empty NTFS folder. You must then type the path to an existing folder or click Browse
     to 


    search for or create a folder to use.
    Do Not Assign A Drive Letter Or Drive Path Choose this option if you want to create
     the partition without assigning a drive letter or path. Later, if you want the partition to be

     available for storage, you can assign a drive letter or path at that time. 

  5. Use the Format Partition page to determine whether and how the volume should be formatted
    . If you want to format the volume, choose Format This Volume With The Following Settings,
     and then configure the following options: 


    File System Sets the file system type as FAT, FAT32, or NTFS. NTFS is selected by default
     in most cases. If you create a file system as FAT or FAT32, you can later convert it
     to NTFS by using the Convert utility. You can’t, however, convert NTFS partitions to FAT or FAT32.
    Allocation Unit Size Sets the cluster size for the file system. This is the basic unit in which
     disk space is allocated. The default allocation unit size is based on the size of the
     volume and, by default, is set dynamically prior to formatting. To override this feature,
     you can set the allocation unit size to a specific value. If you use many small files, you
     might want to use a smaller cluster size, such as 512 or 1,024 bytes. With these settings
    , small files use less disk space.
    Volume Label Sets a text label for the partition. This label is the partition’s volume name
     and by default is set to New Volume. You can change the volume label at any time by
     right-clicking the volume in Windows Explorer, choosing Properties, and typing a new value
     in the Label field provided on the General tab.
    Perform A Quick Format Tells Windows 7 to format without checking the partition for
     errors. With large partitions, this option can save you a few minutes. However, it’s usually
     better to check for errors, which enables Disk Management to mark bad sectors on the disk
     and lock them out.
    Enable File And Folder Compression Turns on compression for the disk. Built-in 
    compression is available only for NTFS. Under NTFS, compression is transparent to users and
     compressed files can be accessed just like regular files. If you select this option, files and

     directories on this drive are compressed automatically. 

  6. Click Next, confirm your options, and then click Finish. The Windows 7 Disk
     Management tool will now show the space configured as a new partition.


കുറച്ചു ദിവസമായി ഫെയ്‌സ്ബുക്കില്‍ പടരുന്ന സ്പാം (പാഴ്‌സന്ദേശം) എന്തെന്നോ, 'ഫെയ്‌സ്ബുക്ക് ഏഴാം പിറന്നാള്‍ ടീഷര്‍ട്ട്'! ഇതു വരെ വന്നുപോയ സ്പാമുകളില്‍ നിന്നും വ്യത്യസ്തമാണ് ഇതിന്റെ പ്രവര്‍ത്തന രീതി. ഒറ്റനോട്ടത്തില്‍ സ്പാമാണെന്നു തോന്നാത്തതും, ഒരു ശരാശരി ഫെയ്‌സ്ബുക്ക് ഉപയോക്താവിനെ വീഴ്ത്താന്‍ ഉതകുന്നതും.

ഫെയ്‌സ്ബുക്കിന്റെ ഏഴാം വാര്‍ഷികം പ്രമാണിച്ച് ടീഷര്‍ട്ടുകള്‍ സൗജന്യമായി നല്‍കുന്നു എന്നു സൂചിപ്പിക്കുന്ന സ്റ്റാറ്റസ് അപ്‌ഡേറ്റുകളായാണ് ഈ സ്പാം പടരുന്നത്. സ്വന്തം ചുമരില്‍ (ഫെയ്‌സ്ബുക്ക് വാള്‍) പോസ്റ്റുചെയ്യാനുള്ള അവകാശം തനിക്കു മാത്രമായി ക്രമീകരിച്ചാല്‍ ഓട്ടോമാറ്റിക് ആയി സുഹൃത്തുക്കളിലൂടെ പരക്കുന്ന സ്പ്പാമുകള്‍ ഒരു പരിധിവരെ നിയന്ത്രിക്കാമെങ്കിലും ഈ ടീഷര്‍ട് സ്പാം വ്യത്യസ്തമാണ്.

ഫെയ്‌സ്ബുക്ക് സെക്കന്‍ഡറി മെയില്‍ ഐഡി ഉപയോക്താക്കളില്‍ നിന്നുതന്നെ ശേഖരിച്ച് സ്റ്റാറ്റസ് അപ്‌ഡേറ്റുകളിലൂടെ വ്യാപിക്കുന്നു എന്നതിനാല്‍ സാധാരണ സ്പാം ഫില്‍ട്ടര്‍ സംവിധാനങ്ങള്‍ ഇവിടെ ഫലപ്രദമാകുന്നില്ല.

വളരെ പ്രൊഫഷണലായി ഡിസൈന്‍ ചെയ്ത ഒരു വെബ്‌സൈറ്റ് ആണ് ഇതിനായി ഉപയോഗിച്ചിരിക്കുന്നത്. മാത്രമല്ല ഡൊമെയ്‌നുകളും അവയുടെ സബ് ഡൊമെയ്‌നുകളും മാറ്റിമാറ്റി ഉപയോഗിക്കുന്നതിനാല്‍ വളരെ സജീവമായിത്തന്നെ നിലനില്‍ക്കാനും അതിനാകുന്നു.

ഫെയ്‌സ്ബുക്ക് ടീഷര്‍ട്ട് വാഗ്ദാനം ചെയ്ത് ഈ സൈറ്റ് ഉപയോക്താക്കളെ വിദഗ്ദമായി തെറ്റിദ്ധരിപ്പിക്കുന്നു. അതുകൊണ്ടുതന്നെ മറ്റു സ്പാമുകളുടെ വലയില്‍ ഇതുവരെ വീഴാതിരുന്ന പലരും ഈ കുഴിയില്‍ വീഴുന്നു.

Free.be, tbtshirt.into, treefavours.into തുടങ്ങിയ ഡൊമെയ്‌നുകളാണ് ഇതിനായി ഉപയോഗിച്ചിരിക്കുന്നത്. മാത്രമല്ല ബിറ്റ്.ലി, ടൈനി യുആര്‍എല്‍ തുടങ്ങിയ യുആര്‍എല്‍ ചുരുക്കുന്ന സങ്കേതങ്ങളും ഉപയോഗപ്പെടുത്തിയിരിക്കുന്നു.


സുഹൃത്തുക്കളുടേതായി വരുന്ന ഫോട്ടോയോടു കൂടിയതും അല്ലാത്തതുമായ സൈറ്റ് ലിങ്കുകളില്‍ ക്ലിക്ക് ചെയ്താല്‍ പ്രത്യേകിച്ച് സംശയമൊന്നും തോന്നാത്ത, വളരെ പ്രൊഫഷണലായി ഡിസൈന്‍ ചെയ്ത സൈറ്റിലേയ്ക്ക് എത്തപ്പെടുന്നു. നാല് കാര്യങ്ങളാണ് ടീഷര്‍ട്ട് നേടാനായി ചെയ്യാന്‍ ആവശ്യപ്പെടുന്നത്

1. പ്രസ്തുത സൈറ്റിലെ ലൈക്ക് ബട്ടണില്‍ ക്ലിക് ചെയ്ത് പേജ് ലൈക് ചെയ്യുക (ഇതിലൂടെ ഈ സ്പാം നിങ്ങളുടെ സുഹൃത്തുക്കളിലേയ്ക്ക് നോട്ടിഫിക്കേഷന്‍ ആയി എത്തുന്നു.)

2. മൂന്നാമത്തെ സ്‌റ്റെപ് മനസ്സിലാക്കാനുള്ള ഒരു വീഡിയോ കാണുക (കാരണം മൂന്നാമത്തെ സ്‌റ്റെപ്പ് പല ഫെയ്‌സ്ബുക്ക് ഉപയോക്താക്കള്‍ക്കും അജ്ഞാതമാണ് എന്നതുകൊണ്ടുതന്നെ)

3. നിങ്ങളുടെ ഫെയ്‌സ്ബുക്ക് അക്കൗണ്ടുമായി ബന്ധപ്പെട്ട ചില വിവരങ്ങള്‍ നല്‍കുക. ഇതാണ് ഇതില്‍ ഏറ്റവും പ്രധാനപ്പെട്ട ഭാഗം. 
http://facebook.com/mobile
 എന്ന ഫെയ്‌സ്ബുക്ക് മൊബൈല്‍ സൈറ്റില്‍ പോയാല്‍ (ഫെയ്‌സ്ബുക്കില്‍ ലോഗിന്‍ ചെയ്തതിനു ശേഷം) നിങ്ങള്‍ക്ക് ലഭിക്കുന്ന സ്വകാര്യ സെക്കന്‍ഡറി ഈമെയില്‍ ഐഡി പകര്‍ത്തി നല്‍കുവാന്‍ ആവശ്യപ്പെടുന്നു. വളരെ നിരുപദ്രവകരം എന്ന് ഒറ്റ നോട്ടത്തില്‍ തോന്നിക്കുന്ന ഒരു സ്‌റ്റെപ്പ്.

ഫെയ്‌സ്ബുക്ക് സെക്കന്‍ഡറി മെയില്‍ ഐഡിയെപ്പറ്റി അല്‍പ്പം
.....ഫെയ്‌സ്ബുക്ക് പ്രൈവറ്റ് മെയില്‍ ഐഡിയെപ്പറ്റി ഫെയ്‌സ്ബുക്ക് പറയുന്നതെന്തെന്നു നോക്കൂ-

എല്ലാ ഫെയ്‌സ്ബുക്ക് അക്കൗണ്ടുകള്‍ക്കും ഫെയ്‌സ്ബുക്ക് ഡൈനാമിക് ആയി നല്‍കുന്ന ഒരു സ്വകാര്യ സെക്കന്‍ഡറി മെയില്‍ ഐഡി ഉണ്ടായിരിക്കും. അതായത് സ്റ്റാറ്റസ് , ഫോട്ടോകള്‍, വീഡീയോകള്‍ തുടങ്ങിയവ ഈമെയിലിലൂടെ അപ്‌ഡേറ്റ് ചെയ്യുന്നതിനായാണ് തികച്ചും സ്വകാര്യമായ ഈ മെയില്‍ ഐഡി ഉപയോഗിക്കുന്നത്. അപ്‌ലോഡ് ഈമെയില്‍ എന്നപേരിലും ഇത് അറിയപ്പെടുന്നു. ഇത് കൈവശമുള്ള ആര്‍ക്കും പ്രസ്തുത ഈമെയില്‍ ഐഡിയിലേയ്ക്ക് സന്ദേശങ്ങളും ഫോട്ടോകളും വീഡിയോകളും അയച്ച് സ്റ്റാറ്റസ് അപ്‌ഡേറ്റ് ചെയ്യാനാകും. ഇതില്‍ നിന്നും മനസ്സിലാകുന്നില്ലേ ഈ ഐഡി മറ്റുള്ളവരുമായി പങ്കുവയ്ക്കുന്നതിലെ അപകടം!

4. മറ്റു ഫെയ്‌സ്ബുക്ക് സ്പാമുകളേപ്പോലെത്തന്നെ ഒരു സര്‍വെ മുഴുവനാക്കാനും നിങ്ങളുടെ വിലാസവും ഫോണ്‍ നമ്പറും രേഖപ്പെടുത്താനും പറയുന്നതാണ് നാലാമത്തെ സ്‌റ്റെപ്പ്. പേരും വിലാസവും മൊബൈല്‍ നമ്പറുമൊക്കെ ഇത്തരം സ്പാമര്‍മാരുടെ കയ്യിലെത്തിയാലുള്ള അപകടം ഊഹിക്കാവുന്നതേയുള്ളൂ.

ഇപ്പറയുന്ന സ്‌റ്റെപ്പുകള്‍ മുഴുവനായാല്‍ ഉടന്‍ തന്നെ പ്രസ്തുത ഫെയ്‌സ്ബുക്ക് ഉപയോക്താവിന്റെ സ്റ്റാറ്റസ്സായി 'ലഭിക്കാത്ത ടീഷര്‍ട്ടീന്റെ ഫോട്ടോയും ടീഷര്‍ട്ട് ലഭിക്കാനുള്ള സൈറ്റിന്റെ ലിങ്കും' ഒരു അപ്‌ഡേറ്റായി ചേര്‍ക്കപ്പെടും. അതായത് നിങ്ങളിലൂടെ നിങ്ങളുടെ സുഹൃത്തുക്കളും ഈ വലയില്‍ കുരുങ്ങുന്നു.

സ്പാം തടയാന്‍-

ടീഷര്‍ട്ടീന്റെ മോഹവലയത്തിലകപ്പെട്ട് ആവശ്യപ്പെട്ടതെല്ലാം നല്‍കിയവര്‍ ചെയ്യേണ്ടത്...

1. ഫെയ്‌സ്ബുക്ക് സെക്കന്‍ഡറി ഈമെയില്‍ പുതുക്കുക. ഇതിനായി ഫെയ്‌സ്ബുക്കില്‍ ലോഗിന്‍ ചെയ്തതിനു ശേഷം http://facebook.com/mobile എന്ന സൈറ്റ് തുറക്കുക. തുടര്‍ന്ന് 'Upload via Email' എന്ന ഭാഗത്തിനടിയിലുള്ള 'Find out more' എന്ന ലിങ്കില്‍ ക്ലിക് ചെയ്യുക. അപ്പോള്‍ ഒരു പോപ്പപ് വിന്‍ഡോ തുറക്കപ്പെടും. പ്രസ്തുത പോപ്പപ് വിന്‍ഡോയുടെ അവസാനഭാറ്റത്ത് 'Refesth your upload email' എന്ന ലിങ്ക് കാണാം. അതില്‍ ക്ലിക് ചെയ്ത് നിങ്ങളുടെ സെക്കന്‍ഡറി ഫെയ്‌സ്ബുക്ക് മെയില്‍ പുതുക്കാം. 


2. സ്പാം സൈറ്റ് അപ്‌ഡേറ്റ് ചെയ്ത ചിത്രങ്ങളും സ്റ്റാറ്റസ് മെസേജും നീക്കം ചെയ്യുക.

3. അജ്ഞാതനു നല്‍കിയ പേരും മേല്‍വിലാസവും ഫോണ്‍ നമ്പറും ഒന്നും മാറ്റാനാകാത്തതിനാല്‍ അവ ദുരുപയോഗം ചെയ്ത് ഉണ്ടായേക്കാവുന്ന കുഴപ്പങ്ങള്‍ മുന്‍ കൂട്ടിക്കണ്ട് ജാഗ്രത പാലിക്കുക.

4. ഇത്തരത്തിലുള്ള ഒരു സന്ദേശമോ ഫോട്ടോയോ ലിങ്കോ സുഹൃത്തിന്റേതായി ലഭിച്ചാല്‍ അതിനെ 'സ്പാം' ആയി നോട്ടിഫൈ ചെയ്യുക.


രസകരമായ മറ്റൊരു കാര്യം ഈ സ്പാമിനെക്കുറിച്ച് അവബോധം സൃഷ്ടിക്കാനായി എഴുതിയിട്ടുള്ള ബ്ലോഗുകളിലും മറ്റും സ്പാമര്‍മാര്‍ ടീഷര്‍ട്ട് ലഭിച്ചു എന്ന അവകാശവാദം ഉന്നയിച്ച് വിശ്വാസ്യത നേടാനും ശ്രമിക്കുന്നു എന്നതാണ്. മാത്രമല്ല ഈ സ്പാം ഡൊമെയ്‌നുകള്‍ എല്ലാം രജിസ്റ്റര്‍ ചെയ്തിരിയ്ക്കുന്നത് ഇന്ത്യന്‍ മേല്‍വിലാസങ്ങള്‍ ഉപയോഗിച്ചാണ്!

Free Missed Call Alerts in BSNL Mobile
Free Missed Call Alert Tricks:
Dear BSNL users now get free sms alert when you miss a call while you are in no network or switch off by using this tricks
Just Dial *62*+9117010# From your BSNL then its activated for free ,After that you can get SMS Whenever you have miss a call while you are in not reachable


പ്രമുഖ കമ്പ്യൂട്ടര്‍ അനുബന്ധ ഉപകരണ നിര്‍മാതാക്കളായ ലോജിടെക് പുതിയ ഗെയിമിങ് മൗസ് പുറത്തിറക്കുന്നു. സാധാരണഗതിയില്‍ ഗെയിമിങ് അത്ര ചെലവ് കുറഞ്ഞ സംഭവമല്ല. എന്നാല്‍, താരതമ്യേന കുറഞ്ഞ വിലയില്‍ ഒട്ടേറെ സവിശേഷതകളുമായാണ് പുതിയ ജി 300 ഗെയിമിങ് മൗസ് ലോജിടെക് പുറത്തിറക്കുന്നത്.

ജി 300 മൗസില്‍ തന്നെ 2500 ഡി പി ഐ സെന്‍സിറ്റിവിറ്റിയുള്ള ഒപ്ടിക്കല്‍ സെന്‍സറുണ്ട്. സ്‌ക്രോള്‍ വീലിനു തൊട്ടു താഴെയായി ഒന്‍പത് ബട്ടണുകളാണ് മൗസിലുള്ളത്. വ്യത്യസ്ത തരത്തിലുള്ള മൂന്ന് ഗെയിം കണ്‍ട്രോള്‍ പ്രൊഫൈല്‍ വരെ സൂക്ഷിക്കാനാകുന്ന തരത്തില്‍ മൗസില്‍തന്നെ മെമ്മറി സംവിധാനവുമുണ്ട്. 

ഷൂട്ടര്‍ ഗെയിമുകള്‍ക്ക് അനുയോജ്യമായ തരത്തിലുള്ള മൂന്ന് ഗെയിമിങ് പ്രൊഫൈലുകള്‍ ഉള്‍പ്പടെയാണ് മൗസ് വിപണിയിലെത്തുന്നതെങ്കിലും ഇവ മാറ്റുന്നതിനും ഒപ്പം ബട്ടണ്‍ കണ്‍ട്രോള്‍, ഡി പി ഐ സെറ്റിംഗ്‌സ്, റിപ്പോര്‍ട്ട് റേറ്റ് സെറ്റിംഗ്‌സ് എന്നിവ മാറ്റുന്നതിനുള്ള സോഫ്ട്‌വേറും മൗസിനൊപ്പം ഉണ്ടാകും.

ഓരോ പ്രൊഫൈലിനും നിറം നല്‍കുന്നതിനായി ഓണ്‍ബോഡ് ലൈറ്റിംഗും ജി 300 ല്‍ ഉണ്ടാകും. 39.99 അമേരിക്കന്‍ ഡോളര്‍ വിലയിട്ടിരിക്കുന്ന ലോജിടെക് ജി300 സപ്തംബറില്‍ വിപണിയിലെത്തും.

System Requirements

Windows Developer Preview works great on the same hardware that powers Windows Vista and Windows 7:
  • 1 gigahertz (GHz) or faster 32-bit (x86) or 64-bit (x64) processor
  • 1 gigabyte (GB) RAM (32-bit) or 2 GB RAM (64-bit)
  • 16 GB available hard disk space (32-bit) or 20 GB (64-bit)
  • DirectX 9 graphics device with WDDM 1.0 or higher driver
  • Taking advantage of touch input requires a screen that supports multi-touch
  • To run Metro style Apps, you need a screen resolution of 1024 X 768 or greater

Anyone who has used Facebook for a while has come across CityVille. It is one of the most popular online game in Facebook made by Zynga. If you have played CityVille, you will notice that the thing which annoys you the most is the lack of energy. Energy is the most key factor in CityVille as you need it to do anything and everything! Here is a complete guide on how to get more energy in CityVille.


  • Add a lot of neighbors. This can certainly help because you will get 3 energy points when you visit a neighbor.
  • Let your neighbors do the work! When your neighbors collect the rent and harvest crops for you, you wont lose a single energy. The neighbor will in turn gets a 3energy point when he/she visits your city.
  • Ask your CityVille friends to send you a 3+energy as gift. Its an easy job and the energy can be accessed from the Inventory. You can also buy energy but it will cost you a lot of facebook cash which you should be saving for the future.


  • Try to Level Up as soon as possible. Your energy get replenished each time you increase your level. So try to gain more experience points to level up in CityVille.
  • You will get one energy after each five minutes. Please don't rely on this method because it is time consuming


ധരിക്കുന്ന ഷര്‍ട്ടില്‍ത്തന്നെ കണക്‌ട്‌ ചെയ്‌ത്‌ മൊബൈല്‍ ഫോണ്‍ ചാര്‍ജ്‌ ചെയ്യുന്ന അവസ്‌ഥയെക്കുറിച്ച്‌ ഒന്ന്‌ ചിന്തിച്ചുനോക്കൂ. കേട്ടാല്‍ മണ്ടത്തരമെന്ന്‌ തോന്നാമെങ്കിലും ഒരു കമ്പനി ഈ വിദ്യ കണ്ടുപിടിച്ചിരിക്കുകയാണ്‌. മൊബൈല്‍ ചാര്‍ജ്‌ ചെയ്യാന്‍ പ്ലഗ്‌ അന്വേഷിച്ച്‌ നടക്കേണ്ടതില്ലാത്ത കാലം. ഇങ്ങനെ മൊബൈല്‍ ചാര്‍ജ്‌ ചെയ്യാന്‍പറ്റിയ ഒരു ടീഷര്‍ട്ട്‌ ശാസ്‌ത്രജ്‌ഞന്‍ വികസിപ്പിച്ചെടുത്തിരിക്കുന്നു. ശബ്‌ദതരംഗങ്ങളുടെ സഹായത്തോടെയാണ്‌ ഈ വിദ്യ ഉപയോഗപ്പെടുത്തുന്നത്‌. ടീഷര്‍ട്ടില്‍പിടിപ്പിച്ചിരിക്കുന്ന എ4 വലിപ്പത്തിലുള്ള ഭാരമില്ലാത്ത ഒരു ഇലക്‌ട്രീക്‌ ഫിലിം ശബ്‌ദതരംഗങ്ങള്‍മൂലമുണ്ടാകുന്ന കമ്പനം ആഗിരണം ചെയ്‌ത്‌ ഇലക്‌ട്രിക്‌ എനര്‍ജിയാക്കിമാറ്റി ലെഡിന്റെ സഹായത്തോടെ മൊബൈല്‍ ബാറ്ററിയില്‍ എത്തിക്കുകയാണ്‌ ചെയ്യുന്നത്‌. ഇതിനുചെണ്ടേത്‌ മ്യുസിക്‌ ഓണ്‍ ആക്കണമെന്നതാണ്‌. അപ്പോള്‍ ചാര്‍ജ്‌ ചെയ്യാനാകുമ്പോള്‍ മ്യുസിക്‌ ഓണ്‍ ചെയ്യുക. അല്ലെങ്കില്‍ മ്യൂസിക്‌ കേള്‍ക്കുമ്പോള്‍ മൊബൈല്‍ കണക്‌ട്‌ ചെയ്‌തുവയ്‌ക്കുക. അടുത്തിടെ ബ്രിട്ടനില്‍ നടന്ന ഗ്ലാസ്‌റ്റോണ്‍ബറി മ്യുസിക്‌ ഫെസ്‌റ്റിന്റെ ഭാഗമായാണ്‌ ഇത്തരമൊരു വിദ്യ അവതരിപ്പിച്ചത്‌. മൊബൈല്‍ ടെലികമ്യൂണിക്കേഷന്‍ രംഗത്തെ വമ്പന്‍ കമ്പനിയായ ഓറഞ്ചാണ്‌ ഇത്‌ അവതരിപ്പിച്ചത്‌. ഭാവിയില്‍ ഈ സങ്കേതികവിദ്യയില്‍ പരിഷ്‌കരിച്ച രൂപങ്ങള്‍ വന്നേക്കാം.

Installing DHCP

Installing a DHCP server in Windows 2008 is a snap. They created a very simple wizard that walks you through the entire process. Follow me on this journey.
To install a DHCP server from the Control Panel, follow these steps:
  1. From the Start menu, select | Control Panel | Administrative Tools | Server Manager.

  2. Expand and click Roles (Figure A).

  3. Choose Add Roles and follow the wizard by selecting the DHCP role (Figure B).

  4. A new DHCP wizard appears to help you configure a DHCP server.

Figure A

Server Manager

Figure B

Add Roles Wizard
In the previous release of Windows, a wizard did not appear to walk you through creating a DHCP server. Windows Server 2008 has really simplified this process by allowing you to configure a DHCP server in roughly seven steps. Of course, you can still manage your DHCP server from the DHCP Microsoft Management Console (MMC) snap-in or delete and create scopes on the fly.
Let’s continue on through the wizard. Your network cards and static IP addresses are automatically detected and you can choose how DHCP will service clients on different subnets, as shown inFigure C.

Figure C

Choose your static IP addresses to service DHCP clients
On the next window (Figure D), you can specify the applicable DNS server(s) to be used with DHCP when an address is assigned. Figure E displays where you would enter the applicable WINS servers if you require it on your network.

Figure D

Enter your DNS server IP address

Figure E

Enter your WINS server IP address

About scopes

When you create a scope, you must select the range of IP addresses and you must specify the appropriate scope options to include. These options are what we were referring to above when we mentioned that you can assign other network information to your clients at the time they are given an IP address.
There are two types of scope options: Global and Scope. Global options are propagated to all the scopes that you create on that DHCP server, while Scope options are only for the individual scope that you are working with.
For example, if you have different scopes for several different subnets and each subnet will have a different default gateway but will share the same DNS servers, you would want to set the DNS servers as a Global option while the default gateways would be set separately in each scope as a Scope option.
On the DHCP scope window, you will create your scope. Depending on the size of your network and the amount of users that will be assigned IP addresses, some thought must be given to the parameters of your scope selections. In my example (Figure F), I created a simple scope.

Figure F

Creating your scope
The subnet type dropdown allows you to choose wireless as well (Figure G). It defaults to 24 hours. If you want to activate the scope when the wizard is complete, click the Activate this scope checkbox. If you leave it empty, you must activate the scope in the DHCP Microsoft Management Console (MMC) snap-in.

Figure G

You can add multiple scopes before continuing the wizard
With Windows Server 2008, if you have a router (Figure H) that supports and is configured to take advantage of IPv6, you can enable this functionality on your network.

Figure H

Enable IPv6 stateless mode

Authorizing the DHCP server and activating scopes

In previous versions of Windows Server, you had to install and configure your DHCP server and then authorize it in the DHCP MMC snap-in. Authorizing your DHCP server allows you to prevent hackers from configuring rogue DHCP servers. In Windows Server 2008, you have the ability to either authorize the server in the Wizard or authorize it after the fact in the DHCP MMC-snap-in (Figure I).

Figure I

Authorizing your DHCP server
You are now ready to review (Figure J) and confirm your settings before applying your DHCP settings (Figure K).

Figure J

Reviewing your DHCP configuration before applying

Figure K

DHCP installation in progress
Once you have installed the DCHP server, you can manage it from the DHCP MMC snap-in (Figure O) located in Administrative tools. On this screen you can create additional exclusions and reservations.

Adding reservations

In addition to specifying exclusions, you can add reservations to your DHCP server. By adding a reservation, you ensure that a machine always receives the same IP address from the DHCP server.
  1. Right-click on Reservations and choose new reservation.

  2. Enter a friendly name for the reservation and the IP address you want to assign to the computer or device.

  3. Enter the MAC address of the computer or device. (For Windows machines, you can find the MAC address by running ipconfig/all from the command prompt of the machine.)

  4. Enter a description and then choose the following reservation type: DHCP, BOOTP (going across a router), or both, as shown in Figure L. Click Add.

Figure L

Adding a reservation

Adding exclusions

In addition to specifying reservations, you can add exclusions to your DHCP server (Figure M). By adding exclusions, you ensure that machines never receive a DHCP lease for that range of IP addresses. This is very useful to block IP addresses for your servers and routers.

Figure M

Adding an exclusion
In order to add Exclusions, right-click on Address Pools and choose New Exclusion Range as shown in Figure N and Figure O.

Figure N

IP address Exclusion range

Figure O

DCHP MMC snap-in

Newer Posts Older Posts Home
  • Recent Posts
  • Comments
Advertisement

Daily Video

Followers

Page

  • Home
  • hardware tips
  • networking
  • windows tips
  • mobile
  • MALAYALAM
  • liveCricket
  • About
  • (Untitled Page)
  • support
  • Read Malayalam Font

Labels

2008 server (4) aakash (1) active directory (2) android (2) apple (1) applications (1) article (1) automobile (1) basic (2) bike (1) bsnl (1) commands (4) computer (17) crack (1) Create a New Partition on a Windows 7 Hard Disk (1) DHCP (1) DNS (1) domine (2) download (2) english (5) facebook (7) film news (2) gadgets (3) google (6) hardware (15) help (4) how to (2) ibm (1) india (1) information (27) instalation (4) internet (15) iphone (1) malayalam (29) mcitp (4) mcts (5) mobile (9) mobile news (1) mouse (1) nero (1) networking (9) news (2) nokia (4) opera (1) orkut (1) partition (1) recurments (1) roaming (1) siri (1) social networking (5) spam (1) symbian (3) T (1) tablet (1) technews (3) tip (15) tips (1) topolagy (1) tricks (10) troubleshooting (5) twitter (1) usefull (1) virus (1) web news (5) website (1) windows 8 (3) windows7 (10) xp (3) സാങ്കേതികം (3)

Total Pageviews

Photos on Flickr

Blog Archive

  • ►  2012 (3)
    • ►  November (2)
    • ►  January (1)
  • ▼  2011 (54)
    • ►  December (8)
    • ►  November (11)
    • ►  October (10)
    • ▼  September (13)
      • Facebook ALT Key Shortcuts (New Trick)
      • Disable Autorun for Pendrives and USB Devices in W...
      • Create a New Partition on a Windows 7 Hard Disk
      • ഫെയ്‌സ്ബുക്കില്‍ സ്‌പാം പടരുന്നു; ടീഷര്‍ട്ടിന്റെ പ...
      • Free Missed Call Alerts in BSNL Mobile
      • ലോജിടെകിന്റെ പുതിയ ഗെയിമിങ് മൗസ്‌
      • Windows 8 System requrnments
      • Get more Energy in CityVille
      • ധരിക്കുന്ന ഷര്‍ട്ടില്‍ത്തന്നെ കണക്‌ട്‌ ചെയ്‌ത്‌ മൊ...
      • Installing DHCP
      • മൗസ് സ്‌കാനര്‍
      • ബ്ലൂ ടൂത്ത് ടെക്നോളജി ഉപയോഗിച്ച് സെല്‍ ഫോണും ലാപ്‌...
      • മൊബൈല്‍ നമ്പര്‍ മാറാതെ എങ്ങനെ connection മാറ്റാം? ...
    • ►  August (12)
2010 Simplex Enews. All rights reserved.
Designed by SimplexDesign